5. Installing the Axiell Collections software
These instructions assume the following:
- The Windows server has been prepared, and the SQL database and Collections application have been installed.
- Axiell Collections is installed on a Windows server in an Active Directory Domain.
If installation in an Active Directory Domain is not possible, it is possible to install Axiell Collections in a peer-to-peer network within a workgroup. Details here.
To install the Axiell Collections software:
Tip: A comprehensive description of Application Pools and details about settings can be found on the Microsoft Docs site.
A web server can run multiple IIS applications, each with its own URL. Application Pools are a container for grouping and managing IIS applications on a web server. Each Application Pool on the server has its own processes, security policies and resources, and so on; IIS applications (essentially a website hosting Axiell Collections for our purposes) are assigned to an Application Pool.
Amongst other things, it is possible to specify different levels of security to different Application Pools; IIS applications that have the same security requirements would be assigned to the same Application Pool, for instance.
An advantage of Applications Pools is that an issue that affects one pool on the web server will only affect the IIS applications in that pool.
In Step 3 we create an IIS application and add it to an Application Pool. This IIS application will be our Axiell Collections site.
- Open the Internet Information Services Manager.
 How to open IIS Manager
There are various ways to open the Internet Information Services Manager.
In Windows 10:
- Click the magnifying icon in the Taskbar.
- Type
IIS.
In Windows Server:
- Click the Windows button.
- Click the magnifying icon (typically top right of the screen).
- Type
IIS.
This method should work for most versions of Windows and Windows Server:
- Press the Windows button + R on your keyboard to open the Run window.
- Type inetmgr:
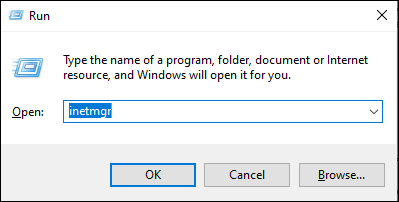
- Click Ok.
Run as Administrator
If using a PC running a Windows operating system (such as Windows 10) rather than Windows Server, it is a good idea to run IIS as an Administrator.
In Windows 10, the simplest way to locate IIS is to search for
IISand select Run as Administrator:
Alternatively, locate the IIS program icon, right-click it and select Run as Administrator.
- Right-click Application Pools (expand the server node under Connections as shown below) and select Add Application Pool from the context menu:

- In the Add Application Pool box, give the Application Pool a name, e.g. AxiellCollectionsPool.
The other settings should be as follows:
- .NET CLR version =
v4 - Managed pipeline mode = Integrated
- Start application pool immediately is checked / ticked

- .NET CLR version =
- Click OK to add the new Application Pool:

Next we configure the Application Pool's Advanced Settings.
- Right-click your new Application Pool (AxiellCollectionsPool in the previous image) and select Advanced Settings to display the Advanced Settings dialogue:
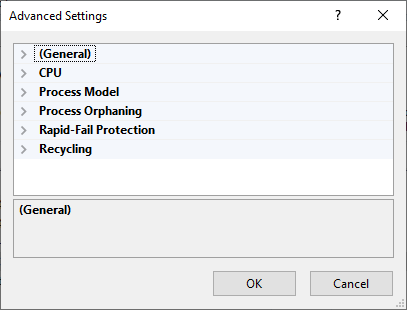
- Specify the following:
Section Setting Value Process Model Identity Here we specify an account with read-only access to the Collections application folders on the Windows server.
Specify the built-in ApplicationPoolIdentity account (its default access rights are typically adequate) or use a custom account (provide a user name and password). Which you use will depend on your SQL server / network access rights and security requirements.
Specifying a custom account allows you to fine-tune the access rights. The account should have:
- a strong password (note that if the password changes it will need to be updated here);
- minimum permissions but be certain that it has sufficient rights to the Axiell Collections software folder (read / write / execute) and Collections application folder (read).
Note: If you install all components of Axiell Collections on a single server, the
ApplicationPoolIdentitywill automatically have sufficient rights as this is a system user.Authorization errorIf you receive an authorization error when adding an application to your Application Pool and testing the connection (see below):

It is likely that the account specified here does not have sufficient access privileges to the Collections application folders on the Windows server.
Microsoft provides more details about Application Pool Identities here.
Process Model Idle time-out (minutes) Set to
0(zero).This will increase performance on start-up of Axiell Collections and avoid the need to log in again when leaving Axiell Collections idle.
Recycling Regular time interval (minutes) Set to
0(zero).This will avoid unnecessary recycling of the Application Pool.
General Start Mode Set to AlwaysRunning.
This will improve performance on start-up by launching the worker process for the Application Pool as soon as IIS is started instead of launching it only when the first request for the web application is received.
This option is available from IIS 8 onwards.

- Click OK to apply the settings.


We recommend using HTTPS as the data transfer protocol.
Note that the following steps assume that you:
- Have purchased and installed an SSL certificate on the server; and
- Are able to redirect HTTP requests to HTTPS (links to help resources explaining how to do so are provided below).
Note: Setting up HTTPS and site mappings is typically the customers responsibility and should occur before installation of Collections.
- In IIS, right-click the server.
- Double-click Centralized Certificates:

This will list certificates that have been installed on the server and that can be accessed by sites from a centralized location. A Centralized Certificate store allows IIS to pick up website certificates from a network share instead of the local certificate store and is useful in environments with multiple IIS servers.
If the Centralized Certificates option is not listed- Open the Windows Control Panel.
- Select Programs and Features>Turn Windows features on or off.
- Expand: Internet Information Services>World Wide Web Services>Security.
- Check / tick Centralized SSL Certificate Support:
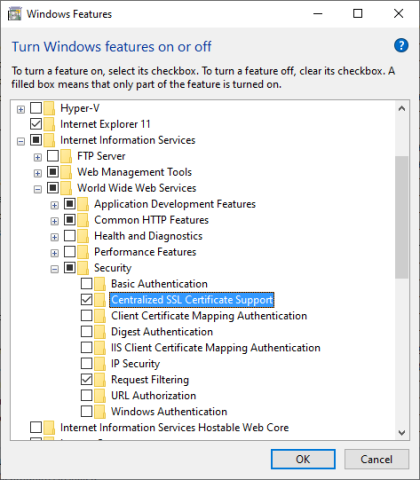
- Click OK to apply the setting.

In IIS:
- Right-click Default Web Site and select Edit Bindings:

- Click Add in the Site Bindings window.
- In the Add Site Binding window select https from the Type drop list.
Additional options will display, including the Select button.
- Click the Select button:
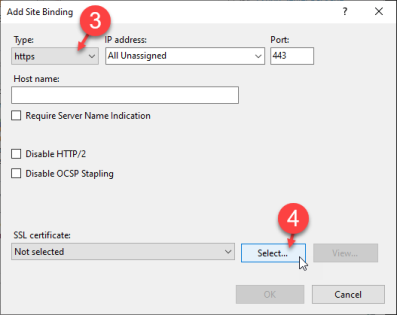
and in the Select Certificate window select the appropriate SSL certificate.
- Click OK to close the open windows, and then Close the Site Bindings window.
- The final step is to redirect HTTP requests to HTTPS by using, for example, the (Collections 1.12) <SecureConnection>true</SecureConnection> option in
settings.xml1 or with the URL Rewrite plug-in available for IIS.Tip: There are many resources describing how to set up redirects, including this one.
In order to make a web application available to users for access on the Internet or an Intranet it is necessary to create an IIS application.
In IIS:
- Expand Sites, right-click Default Web Site and select Add Application from the context menu:

- In the Add Application window:
- Enter a name for the application in Alias, e.g. Collections.
Note: Do not include spaces in this name.
- Click Select and select the application pool you just created, e.g. AxiellCollectionsPool, and click OK:

- In Physical Path, navigate to the folder in which Axiell Collections will be deployed. In this example:
C:\Collections\Axiell Collections
- To improve performance, click to tick the Enable Preload checkbox:

Note: Enable Preload is available from IIS 8 onwards.
- Click Connect as... and ensure that Application user is selected:

The Collections application uses Anonymous authentication rather than a specific user.
Tip: When the application has been deployed you can confirm that Anonymous authentication is used by following these steps.
- Click Test Settings.
You should receive a tick for authentication and authorization:

If not, check that the account specified when setting up the Application Pool has sufficient access privileges (details here).
- Enter a name for the application in Alias, e.g. Collections.


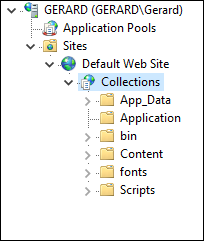
Your new IIS application is added below Default Web Site, e.g.:
![]()
So far we have created an IIS application. Next we will deploy the Axiell Collections core software package into this IIS application.
Tip: These steps are similar when upgrading an existing installation of Axiell.
Note: Before deploying the Axiell Collections package, be sure that you have full access rights to the target folder. If not, deployment will fail.
To deploy the Axiell Collections core software package:
- Right-click the Collections application you added below Default Web Site.
Note: The default location for deploying Axiell Collections is
C:\inetpub\wwwroot, but it can be deployed in any folder. You would right-click Default Web Site to deploy Axiell Collections in the default location, specifying which <folder> at step 5. - Select Deploy>Import Application:

Note: If the Deploy option is not available, check that the required IIS settings have been enabled.
- In the Import Application Package window, browse to the Axiell Collections core software package zip file, e.g.:

- Click Next and leave the settings unchanged on the Select the Contents of the Package screen.
- Click Next to display the Enter Application Package Information screen:
- If you right-clicked Default Web Site at step 1, edit the application path. Axiell Collections will be installed in a folder with the name you provide here:

Tip: It is possible to deploy more than one application at the root level, so it is important to specify a folder here.
- If you right-clicked the Collections application added below Default Web Site at step 1, you will probably want to delete anything from the Application Path text box as anything here will be included in the Collections site's URL:

- If you right-clicked Default Web Site at step 1, edit the application path. Axiell Collections will be installed in a folder with the name you provide here:
- Click Next to display the Overwrite Existing Files screen:

Typically, you would leave the No radio button selected:
Option Description No
Select this option if upgrading an existing Axiell Collections installation. This will retain any custom settings in \App_Data\settings.xml.
This option is also fine if performing a fresh installation of Axiell Collections.
Tip: If you are upgrading Collections, compare the installation's settings.xml with the default settings.xml (typically called settings.example.xml) and check whether there are any new options that need to be configured.
Yes
Select this option if you have an existing Axiell Collections installation in this location and wish to replace it with a fresh installation (deleting all existing files and folders).
- Click Next to import the application package.
If all goes well, the package will install successfully and you will see the Axiell Collections core software folders deployed in the IIS application:
Note: See Troubleshooting if the package does not install successfully.
- Click Finish to close the Import window.
- Select the Collections application pool and click Recycle:

Note: Any time you update the Axiell Collections software (editing
settings.xmlfor instance) or make changes to the Collections application, be sure to perform this Recycle step.Confirm that the application pool:
- Is running - if not, select Start.
Has an associated application - the column value should not be
0.


We have created an IIS application and deployed the Axiell Collections core software package into this IIS application.
Next we update the settings.xml file located in the \App_data folder.
When Collections is installed you will find an example settings file called settings.example.xml in the \App_Data folder, typically:
C:\Collections\Axiell Collections\App_Data
settings.example.xml file contains an explanation for each possible setting (with additional details provided below).
Rename this file to settings.xml
- Open settings.xml (in Notepad++ for instance).
Typically the file is located in the \App_Data folder, e.g.:
C:\Collections\Axiell Collections\App_Data
- Make your changes and save the file.
- Recycle the Collections application pool.
Note: This last step is critical any time changes are made to settings.xml. Be sure that no one is using Collections when the application pool is recycled: any active users will be logged out without saving their work.
The settings we are most interested in are described below:
<!-- Public base URL of the system for use if the system is deployed behind a reverse proxy.
Otherwise, leave this blank. -->
<BaseUrl></BaseUrl>
<!-- Content Security Policy (CSP) settings -->2
<Csp Enabled ="true">
<!--Optional whitelisted domains, wildcards are allowed.
For example *.domain.com. If not supplied then the BaseUrl's domain will be used.-->
<Whitelist></Whitelist>
<!-- Optional additional domains for images. -->
<WhitelistImages></WhitelistImages>
</Csp>
<!-- Additional HTTP headers to apply. -->
<Headers>
<Header Name="Referrer-Policy" Value="strict-origin-when-cross-origin" />
<Header Name="X-Content-Type-Options" Value="nosniff" />
<Header Name="X-XSS-Protection" Value="1; mode=block" />
</Headers>
</Security>
<!-- Redirects all http requests to https if set to true. -->
<SecureConnection>true</SecureConnection>
<SessionManagers Current="SQL">
<SessionManager Id="SQL" Scope="Collections" Assembly="Axiell.Alm.Database.Sql"
Type="Axiell.Alm.Database.Sql.SqlApplicationSessionManager">
<LicenseInfo>
<Holder>Customer name</Holder>
<Count>10</Count>
<!-- Optional expiry date. yyyy-mm-dd -->
<!--<Expires>2020-12-31</Expires>-->
</LicenseInfo>
<Setting Key="Languages" Value="en,nl" />
<Setting Key="AlwaysPromptBeforeSave" Value="true" />
<Setting Key="CacheScripts" Value="false" />
<Setting Key="Path" Value="C:\Collections\Model Application\xplus" />
<Setting Key="ImageCacheFolder" Value="" />
<Setting Key="Preload" Value="Full" />
<Setting Key="DomainController" Value="" />
<Setting Key="DomainContainer" Value="" />
<Setting Key="DomainUsersOnly" Value="true" />
<Setting Key="UseOriginalMediaFileName" Value="true" />
<Setting Key="DashboardVisible" Value="true" />
</SessionManager>
<Help>https://help.collections.axiell.com</Help>
<Logging Path="c:\Logs"></Logging>
</SessionManagers>
Note: If an organization restricts the Axiell Collections server to the local network so that it has no connection to the internet (usually for reasons of security), the Online Help will not be accessible from within Axiell Collections. A solution is provided in the description of the <Help> setting below.
<Security> (CSP)
Content Security Policy (CSP) is an additional layer of security that helps to detect and mitigate certain types of attacks, including
Cross-Site Scripting (XSS) and data injection attacks. Collections 1.12.1 onwards supports the A+ HTTP observatory level of this policy, enhancing its security. When implemented, an HTTP response header is sent to the browser to tell it which content to allow and which content to block (scripts on another domain for example).
By default, settings.example.xml sets the CSP option to enabled="true"; to profit from this extra security, add this setting to your existing settings.xml:
<Security>
<!-- Content Security Policy (CSP) settings -->
<Csp Enabled ="true">
<!--Optional whitelisted domains, wildcards are allowed.
For example *.domain.com. If not supplied then the BaseUrl's domain will be used.-->
<Whitelist></Whitelist>
<!-- Optional additional domains for images. -->
<WhitelistImages></WhitelistImages>
</Csp>
<!-- Additional HTTP headers to apply. -->
<Headers>
<Header Name="Referrer-Policy" Value="strict-origin-when-cross-origin" />
<Header Name="X-Content-Type-Options" Value="nosniff" />
<Header Name="X-XSS-Protection" Value="1; mode=block" />
</Headers>
</Security>
Optionally, provide a list of trusted URLs (to websites or images) in the Whitelist and/or WhitelistImages nodes (typically you will not need to use these).
SecureConnection
From Collections 1.12 onwards the following setting is specified by default in the settings.example.xmlfile:
<SecureConnection>true</SecureConnection>
This setting redirects all Collections HTTP requests to the more secure HTTPS protocol. The HTTP Strict-Transport-Security header is added to all responses ensuring that a browser always connects to a website over HTTPS.
If this setting is not included in your installation's custom settings.xml, we recommended that it is added: when set to true, a Collections request from insecure HTTP will fail if the system cannot redirect to HTTPS.
If set to false(the default if the SecureConnections element is missing for compatibility with old installations), then insecure HTTP is allowed.
SessionManagers & SessionManager
Typically a single instance of the Collections application is installed and accessed by all staff.
In some large organizations comprising multiple institutions (a museum group managing a number of museums for example), each institution has its own installation of the same Collections application. In this case, the organization as a whole will typically have a single SQL Server database and each museum in the group is only given access to its own data. For our purposes we call this a multi-tenancy installation![]()
Amongst other things, we specify the type of installation with the SessionManager Id= setting.
The value for SessionManager Id= can be:
| Value | Description |
|---|---|
|
|
Used where a single instance of the Collections application is installed and accessed by staff. Note that when
|
|
|
With this setting we set up a multi-tenancy session manager to restrict login to one or more Active Directory groups. It is used for:
Details below. |
|
|
In fact, any other
Furthermore, when setting up a multi-tenancy installation of Axiell Collections, we define a
Details below. |
More than one SessionManager can be defined in a settings.xml file, but only one is considered Current:
- More than one
SessionManagermight be defined insettings.xmlfor various reasons, including for testing purposes. As we see below it is a simple matter to switch between oneSessionManagerand another. - More than one
SessionManagerwill be defined in a multi-tenancy installation: a"Multi"SessionManager, and aSessionManagerfor each tenant.
We specify which SessionManager is active with the opening SessionManagers Current= setting. The value for SessionManagers Current= is set to the Id of the SessionManager that should be active. For example, in a multi-tenancy installation of Axiell Collections, we would specify:
<SessionManagers Current="Multi">
<SessionManager Id="Multi"...
The following attributes can be specified for the SessionManager tag:
| Attribute |
Optional |
Description |
|---|---|---|
|
|
Yes |
The Collections API can be used across multiple applications (Collections and Adlib Internet Server, for example). Where different front ends use the Collections API and you do not want actions such as the resetting of all user interface settings to their default in one front end to affect others, this attribute can be used to differentiate front ends. For a Collections application, set:
|
|
|
|
Where:
|
|
|
|
Where:
|
The following settings can be defined for a SessionManager:
Key="Languages"
Optional setting. If this setting is not defined, Collections attempts to load all available interface languages even if there are no translations of interface items (field and button labels, etc.) in those languages. This leads to a substantial delay the first time a user logs in.
To improve performance include this setting with a list of comma-separated ISO 639-1 language codes for interface languages with translations required by users.
For example:
<Setting Key="Languages" Value="en,nl" />
will load English and Dutch translations of the interface.
Key="AlwaysPromptBeforeSave"
Optional setting. If this setting is not defined, a value of "false" is assumed.
In Result set View an edited record is saved without asking for confirmation that changes should be saved whenever the user closes or leaves the edited record. In Record details View, clicking the Save record  button will also save a record automatically without displaying the Save Prompt.
The Save Prompt will always display in Record details View when the Edit  button is clicked or a user leaves an edited record (by clicking another record in Result set View for example):

If it is preferable that users always confirm their changes are saved, this setting in settings.xml will restrict the ways an edited record can be saved to those that display the Save Prompt (it will not be possible to edit a record in Result set View):
<Setting Key="AlwaysPromptBeforeSave" Value="true" />
As a result:
- The Edit button will no longer display in the Result set toolbar. A record will need to be edited in the Record details pane.
- The Save record button will no longer display in the Record details View toolbar and it will be necessary to select the Edit button in order to save a record.
Tip: You can use this setting if you do not want users to edit records in the Result set view.
Key="CacheScripts"
Optional setting used for development purposes.
A setting of:
<Setting Key="CacheScripts" Value="false" />
will reload an adapl bin file every time it is called so that recycling of the application pool is not required after making changes to the adapl.
Leave out this setting to increase performance or set to Value="true".
Key="Path"
Required. Set to the full path of the Collections application folder on the Windows server, e.g.:
<Setting Key="Path" Value="C:\Collections\Collections Application\xplus" />
Note: For network shares do not use drive letters; instead use the path to the server in a format such as: \\myserver\collections\xplus
If more than one type of application is available in the Collections application folder, e.g. archive, library, museum, XPlus, it is possible to set the path to the Collections application folder (root) itself rather than to a specific sub folder, e.g.:
<Setting Key="Path" Value="C:\Collections\Collections Application" />
At log in (once the user's credentials have been verified), a drop list will display enabling the user to select which of the available applications to access.
Multi-tenancy
In a multi-tenancy installation, each institution has its own copy of the Collections application, and therefore its own Collections application folder on the Windows server. As we see below, each tenant / institution also has its own SessionManager definition. The Path setting in this definition must point to the Collections application folder on the Windows server for that tenant / institution, and not the Collections application root folder.
Key="ImageCacheFolder"
The full path to a folder (local or UNC) that Collections is authorized to use as a cache folder.
The Application Pool user must have sufficient access rights to create sub folders and to write files to those folders. This should not be an issue if the built-in ApplicationPoolIdentity was specified (details above), but may be if a custom account was specified.
Be sure that the IIS application is using Anonymous Authentication and that it is set to Application pool identity. Details here.
Typically the pathway is to the images sub folder under the Collections application folder on the Windows server, e.g.:
C:\Collections\Collections Application\images
Note: It is not necessary to point to this images folder however; any accessible folder can be specified.
When images are displayed and automatically resized by Collections (for instance when thumbnails are generated following a search), a .bmp copy of the image in the displayed size(s) is stored in an application-specific, database-specific and field-specific sub folder. Next time the resized image is required it is quickly retrieved from the cache rather than needing to be resized again.
Key="Preload"
Specifies which elements of the Collections web application are preloaded and therefore how much delay is experienced when a user first logs in to Axiell Collections. This setting affects the time it takes to display:
- the login dialogue;
- the Select data source box when running a search; and
- a record after performing a search.
There are four possible values:
|
Value |
What is preloaded |
|---|---|
|
|
Nothing. Preload is switched off. |
|
|
Database / data source info. |
|
|
Basic schema info and commonly-used objects such as screens. |
|
|
Everything, including adapls if required. |
The relevant schema objects are loaded when the application pool starts so that delays occur before the login dialogue is opened for the first time during a session.
Note: The application pool user must have at least read access rights to the application for preloading to work.
Multi-tenancy
Enabling this option may not be the best option for multi-tenancy installations as it forces a preload of the application regardless of whether the tenant uses it and therefore increases baseline server memory and resource usage.
Key="DomainController" and Key="DomainContainer"
Amongst other things, these settings are useful for tightening security for local demo installations that are not connected to the Active Directory domain. If a customer has locked down their default Active Directory configuration, we need to be able to query non-default domain controllers and containers:
DomainControllerThe IP address or name of the domain controller, including the required port number.
If an IP address, the format is number.number.number.number:port, e.g.:
123.456.789.012:636Default ports include:
389- No SSL (Secure Sockets Layer), regular AD server636- SSL, regular AD server3269- Global Catalogue serverDomainContainerThe name of the domain as a DomainContainer (DC) string, e.g.:
DC=456,DC=789,DC=012-OR-
DC=axiell,DC=comThis determines which domain / host (within the network) to bind to since an AD server can handle multiple domains.
Set to "true" to enable SSL (Secure Sockets Layer) support.
Key="DomainSSLTrustCertificate"
Set to "true" if using SSL and a self-signed certificate.
Set to "false" if the SSL certificate comes from a trusted provider (in other words, you paid for it).
Key="DomainUsersOnly"
The default value for this setting is "true": only Active Directory domain users are able to log on to Axiell Collections.
When set to "false", if a user is unable to authenticate against Active Directory, Collections will automatically authenticate against local Windows accounts on the Collections server.
Note: Although the account will be on the Collections server (which should be secure), behaviour may not be as expected and this may allow access that is not controlled through Active Directory.
Similarly, for local demos that are disconnected from the domain, set to "false". In this case:
- Leave Identity in the Application Pool as
ApplicationPoolIdentity:
- In the Collections application, connect as a specific user:


Key="UseOriginalMediaFileName"
Optional setting (available in Collections 1.7.19350.2 onwards). If this setting is not specified, a value of "false" is assumed:
|
Value= |
Description |
|---|---|
|
|
When a media file is uploaded to an Image or Application type field, typically labelled Reference, the field is populated with greyed out text stating <<New>> until the record is saved. When the record is saved a GUID is generated for the media file and the file is saved using this GUID as its name:
|
|
|
By setting the value to
|
Key="DashboardVisible"
Introduced with Collections 1.11.2: previously, the DashboardVisible setting in the web.config was used to enable the Workflow screen directly after logging into Collections when Workflow is part of the installation (this defaulted to false after installation of Collections). This setting has been moved to the settings.xml file for Collections.
Note: The setting in the web.config file has been deprecated.
<Setting Key="DashboardVisible" Value="true" />
|
Value= |
Description |
|---|---|
|
|
When set to |
|
|
Enable the Workflow dashboard. |
Key="DefaultExpand"
Collections version 1.13 onwards makes an Expand search implicit whenever a search of an inherited field is performed and it is no longer necessary to enable the Expand option when performing a Standard search or to apply the Expand operator when performing an Advanced search when searching inherited fields.
If an implicit Expand search on inherited fields is undesirable, it can be switched off by including the following setting:
<Setting Key="DefaultExpand" Value="false" />
With this setting, the Expand operator will need to be used explicitly when searching inherited fields (as it is in versions of Collections prior to 1.13).
Note: This setting applies by default and does not need to be set to true.
Key="HierarchyThreshold"
The HierarchyThreshold setting is available from Collections 1.15.1 onwards.
In earlier versions of Collections, the maximum number of records that can be loaded in the Hierarchy browser is 1000; the actual number of records to load is specified using the Number of nodes per request option in the Record Hierarchy settings box:
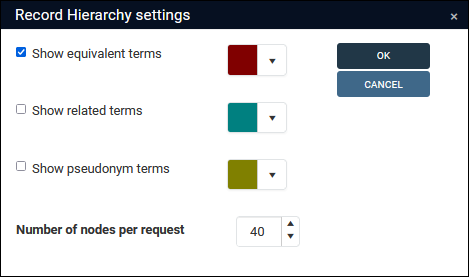
Any number specified higher than 1000 is reset to 1000.
With the HierarchyThreshold setting the maximum number of records to load can be specified and it can be greater than 1000:
<Setting Key="HierarchyThreshold" Value="0" />
The Value can be set in two ways:
- By setting
Valueto zero (or less), the maximum number is set to 214,7483,647: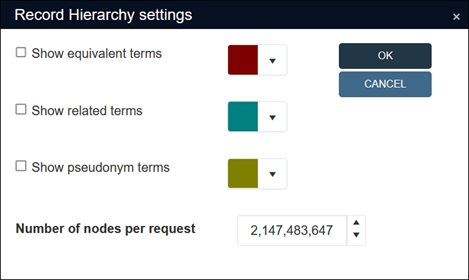
-
When
Valueis greater than zero, the specified number is the maximum number of records that can be loaded (this can be less than or greater than 1000).A setting of:
<Setting Key="HierarchyThreshold" Value="88" />
will set the maximum number of records that will load to 88.
A setting of:
<Setting Key="HierarchyThreshold" Value="5000" />
will set the maximum number of records that will load to 5000.
If a HierarchyThreshold setting is not specified in settings.xml, the default limit of 1000 applies.
Note: Increasing the limit to a high value will have a negative impact on performance!
<Help>
This setting is only relevant for organizations that restrict the server hosting Axiell Collections to the local network so that it has no connection to the internet (typically done for security reasons). In this case, the Online Help will not be accessible from within Axiell Collections (by clicking the Help option in the Main menu for example).
When Collections starts up it checks if topicmapping.xml3 is available in the location specified in the <Help> node of the settings.xml file. By default this is a URL:
<Help>https://help.collections.axiell.com</Help>
If the server cannot access the Internet, the check will fail and the Online Help will not be accessible from within Collections.
A solution is to point Collections at a local version of topicmapping.xml installed with the Axiell Collections software on the server. topicmapping.xml is located in the same folder as settings.xml.
- Open settings.xml and locate the <Help> node (close to the end of the file).
- Edit the <Help> node by changing the URL to point to the local folder:
<Help>~/App_Data/</Help>
Now when Collections starts, the check will not fail and as long as the user has internet access from their computer, the Online Help will be accessible.
Note: Although topicmapping.xml does not change often, the downside of this workaround is that the local topicmapping.xml might get out of date.
With the Logging setting we create a log file for any errors reported by Collections, which can help Axiell Support identify and solve any problems that arise; typically you would only enable this option if issues are occurring and the Axiell Help desk requested it.
As a minimum, specify the path to a folder in which to create the log file:
<Logging Path="c:\Logs"></Logging>
Optionally,
set Warning, Error, Debug and Trace to true or false depending on how extensive logging should be, e.g.:
<Logging Path="c:\Logs" Warning="true" Error="true" Debug="false" Trace="false" />
where:
|
Option |
Details |
|---|---|
|
Warning |
Log incidents that are potentially harmful to the normal operation of Collections. |
|
Error |
Log errors causing Collections to stop working properly. Note: This is the default level of logging if you only specify Path in the Logging setting. |
|
Trace and Debug |
Provide verbose information, such as route trace logs; these will increase the size of the log file substantially and should only be turned on if requested by Axiell Support. |
Note: The log file name defaults to FrontEnd.txt.
As the log file can grow quite large, Collections 1.12 onwards allows you to provide an optional format string for the file name and to create a new logging file each day, month or year. To create a new file every day, add the following string to the fixed part of the file name:
${date:format=yyyy-MM-dd}
Tip: Leave out -dd or -MM-dd to create a new file only once every month or year respectively.
Provide an optional MaxOldFiles argument to specify how many log files to keep, purging older files when creating a new one. If MaxOldFiles is omitted or 0, purging is disabled. Example:
<Logging Path="c:\Logs" File="FrontEnd.${date:format=yyyy-MM-dd}.txt" MaxOldFiles="10" />
The following settings are relevant for:
- Any organization with a multi-tenancy installation.What is multi-tenancy?
For our purposes, multi-tenancy describes an environment where a single Collections installation (IIS application) runs multiple Collections applications, where access rights and settings determine which Collections application a particular tenant / institution has access to and in which part of the database tables records are written.
Multi-tenancy occurs when an organization comprising multiple institutions (individual museums within a museum group for instance) requires each institution to use its own version of the same Collections application typically to restrict a museum's access to its own data within a shared database.
Consider the ACME Museum Group, which comprises ten separate museums. A single database is used by the entire group, and each museum is only permitted access to its own object data, with Head Office having access to all object data.
In this case:
- A single Axiell Collections installation is set-up on the web server, accessible to all museums in the group.
- Within this single Axiell Collections installation on the web server, each museum has a folder that contains an instance of the same Collections application, XPlus for example.
- The organization as a whole shares a SQL Server database and each museum in the Group is only permitted to access its own data. This is achieved by assigning each museum a database record number range for any database tables that will hold their data:
- The structure of a table in the database is specified in a
.inffile in the\datadirectory: the structure of the Thesaurus table, for example, is calledthesau.inf. - By default, each
.infspecifies a single dataset A record number range in a database table used to group similar types of records. A database table will always have one dataset (with the full range of record numbers), but there may be one or more sub-divisions within this record number range. It is possible to work with (e.g. search) a sub-divided dataset or the full dataset (each sub-division simultaneously). Each dataset is considered a data source in its own right. with a lower and upper record number limit. It is possible to specify multiple datasets in a .inffile however, one for each institution for instance, each with a specific record number range.In this example, the folder for each museum includes a
\datadirectory and a copy of the.inffiles.If the Thesaurus table should be available to all museums, we would not specify record number ranges for each museum in
thesau.infand all records in the Thesaurus table would be accessible to every museum in the group. On the other hand, if each museum should only have access to its own object data, a record number range would be specified for each museum in bothintern.infandextern.infand a copy of these.inffiles would be copied to the\datadirectory for each museum.
- The structure of a table in the database is specified in a
See What is a
.inffile? for more details.In this example, access to records by Head Office could be handled through access rights (giving Head Office access to each museum application, or perhaps there could be an additional XPlus application for Head Office with
.inffiles specifying the entire record number range).In this case we would associate an Active Directory group with a specific tenant / institution and using the
Pathsetting we channel users in the group to a specific Collections application on the Windows server. - Any other organization that wants to restrict access to Collections to members of one of more Active Directory groups.
Note: When
SessionManager Id="SQL", all domain users can access the application. If this is not desirable, one solution is to specifyId="Multi"and restrict login to one or more Active Directory groups.In this case our objective is to restrict access to Collections to one or more specified Active Directory groups.
Two or more SessionManager definitions are required:
SessionManager definition
The opening SessionManager definition identifies the installation as a multi-tenancy installation using Id="Multi".
For our purposes this includes any organization (multi-tenant or not) that wants to restrict access to Collections to one or more Active Directory groups.
The SessionManagers and opening SessionManager are specified as:
<SessionManagers Current="Multi">
<SessionManager Id="Multi" Assembly="Axiell.Alm"
Type="Axiell.Alm.Database.MultiTenant.MultiTenantApplicationSessionManager">
<Setting Key="ADGroup_Name1" Value="Id1" />
<Setting Key="ADGroup_Name2" Value="Id2" />
<Setting Key="ADGroup_Name3" Value="Id3" />
<Setting Key="ADGroup_Name4" Value="Id4" />
<Setting Key="ADGroup_Name5" Value="Id5" />
...
</SessionManager>
As we see, each Active Directory group that requires access is specified as a Setting in the opening SessionManager definition, where:
| Element | Description |
|---|---|
|
|
is the name of an Active Directory group that requires access to Axiell Collections. Note: Do not include the domain when naming the group. |
|
|
is an Use a descriptive name without spaces or special characters. This |
For example:
<Setting Key="app01users" Value="MuseumA-app01" />
specifies that the Active Directory group called app01users has an Id of MuseumA-app01.
SessionManager definition for each tenant / group
For each Active Directory group listed in the "Multi" SessionManager definition we specify a SessionManager using the associated Id.
If the opening SessionManager includes:
<Setting Key="app01users" Value="MuseumA-app01" />
we define a SessionManager where Id="MuseumA-app01".
For example:
<SessionManager Id="MuseumA-app01" Assembly="Axiell.Alm.Database.Sql" Type="Axiell.Alm.Database.Sql.
 SqlApplicationSessionManager">
    <Setting Key="Path" Value="C:\Collections\museums\All-app00\model\xplus" />
</SessionManager>
This SessionManager definition specifies that when users in the Active Directory group called app01users log in to Axiell Collections, they access the XPlus application installed on the Windows Server in this location:
C:\Collections\museums\All-app00\model\xplus
While the SessionManager definition for a tenant in a multi-tenancy installation can include most of the settings described above, the critical setting is Path. In a multi-tenancy installation, each institution has its own copy of the Collections application on the Windows server. For each tenant, the Path setting must point to the Collections application folder for that tenant.
Collections applications must be secured (typically at the database and field levels) to restrict unauthorized access to certain or all data; as noted above, with a "SQL" SessionManager, any domain user can in principle log on and access the Collections application unless access rights have been specified.
Typically you would assign access right of Read, Write or Full to specific users or user groups, and assign None access right to $REST per database to keep out all other users.
In a multi-tenancy installation, users are only able to log on to a designated application through membership of a specific Active Directory group; typically you would only populate these AD groups with users who have at least Read access to some or all of the databases, and further specify their access rights with the Collections access rights mechanism in Axiell Designer.
Note that for Collections, the Default access rights for a .pbk cannot be set to None as this would cause the application to be invisible to all Collections users.
Also note that the Exclude and Include database Authorisation types currently (November 2019) have not been implemented, while Specified rights has been. So, when making an Adlib application Collections-ready, you may want to check these settings in case a different access rights solution is required.
In a browser, navigate to localhost\collections.
If all goes well, an Axiell Collections login screen should display.
If you receive an error when deploying the Axiell Collections package and the server is not located in an Active Directory domain, a solution may be to change the DomainUsersOnly setting in settings.xml.
Details here.